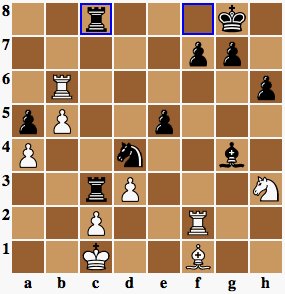
 When my wife first learned to play Chess, she came to me one day with a book I had given her to peruse: "It says in this book," she told me, "that half of Chess is simply waiting for your opponent to make a mistake." She put the book down, crossed her arms, and looked at me with furrowed brows. "That hardly seems like fun."
And yet, that is in fact a large part of Chess. The only difference between me and the Grandmasters is that they can think about eight, nine, or ten moves ahead of me... and the player who can't think far enough is walking into a trap.
The game below is one of my favorites because it shows how you can be behind on points, behind on position, and stave off defeat just long enough in the hopes that your opponent overlooks something major. In essence, you wait long enough until your opponent makes a mistake, and then pounce. Some would say that's not fair, or even fun, but Chess is a game of war and war is a series of tragic injustices, many of which include shockingly stupid blunders that almost always benefit the enemy. It doesn't matter how you take the hill, just that you take the hill. Remember Rob Roy? Exactly.
Here's the entire game:
1. e4 e5
2. Nf3 Nc6
3. Nc3 Nf6
4. a3 Bc5
5. Qe2 d6
6. h3 Bd7
7. b4 Bd4
8. Bb2 O-O
9. Ng5 h6
10. h4 Ng4
11. Nh3 Qf6
12. f3 Qxh4+
13. g3 Qxg3+
14. Kd1 Nf6
15. Rh2 Nh5
16. Na4 Bxb2
17. Nxb2 Nd4
18. Qf2 Qxf3+
19. Qxf3 Nxf3
20. Rf2 Nd4
21. a4 Bg4+
22. Kc1 Nf6
23. d3 b6
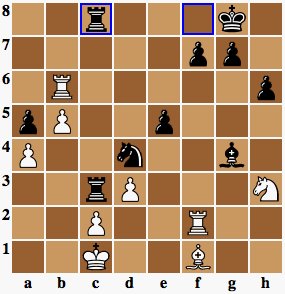
24. Nc4 Rad8
25. Ra3 d5
26. Ne3 dxe4
27. Rc3 Be6
28. Nc4 e3
29. Nxe3 Ng4
30. Nxg4 Bxg4
31. Rxc7 a5
32. b5 Rc8
33. Rb7 Rc3
34. Rxb6 Rfc8
35. Kb1 Bd1
36. Rc6 Nxc6
37. b6 Rb8
38. Kb2 Rc5
39. c4 Rxb6+
40. Kc1 Bxa4
41. Kd2 Nd4
42. Kc3 Bd1
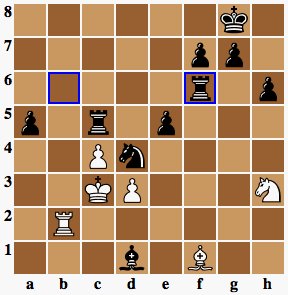
43. Rb2 Rf6
44. Bg2 Ra6
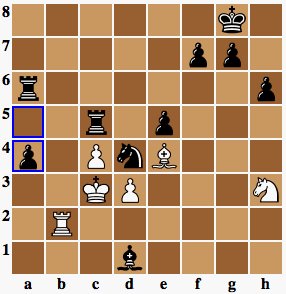
45. Be4 a4
46. Nf2 a3
47. Rb8+ Rc8
48. Rxc8# 1-0
And here's the game with commentary:
1. e4 White opens with a traditional pawn move.
e5 Black returns with an equally traditional pawn attack.
2. Nf3 White attacks Black's pawn as expected.
Nc6 Black defends as expected with his own Knight.
3. Nc3 Another traditional Knight opening.
Nf6 Black responds as expected.
4. a3 Anticipating a Bishop advance, White preempts with an A-file pawn advance.
Bc5 Black moves out his Bishop anyway, but not too far. He must be trying for a Queen-Knight fork with a Bishop-Knight battery at F2.
5. Qe2 So White defends F2 by moving out the Queen.
d6 Wanting to attack with his other Bishop, Black prepares to move out his white-square Bishop.
6. h3 And White anticipates this by advancing his H-file Pawn one square.
Bd7 Black develops his Bishop only one square, maybe in anticipation to castle to either side?
7. b4 White attacks the Bishop.
Bd4 Black pins the Knight to the Queen-side Rook.
8. Bb2 Black moves the black-square Bishop to prepare for a decouvert with the Knight to move to B4.
O-O Black castles, and too early in my view. White can now focus all his energies on destroying the Pawn cover.
9. Ng5 Preparing for a Knight gambit at H7, White moves the Knight in close.
h6 Black attacks with his H-file Pawn... but this is still good: luring the H file Pawn off its rank opens up the H-file. Leaving the Knight in its position is safe, and good overall if captured...
10. h4 ...especially if it opens up a Rook attack by re-capturing with White's H-file pawn.
Ng4 Perhaps seeing this, Black opts to go for an assault on F7 anyway, forcing an exchange and leaving White down 3 points by losing his Queen to a Knight and Bishop AND forcing White to lose his castling option. For Black, the best defence is indeed a good offense.
11. Nh3 Aware that a "Knight on the rim is grim", White still values the castling option and defends F2 by moving his Knight back.
Qf6 But Black pounds on F2 some more by bringing out his Queen.
12. f3 White defends F2 by attacking the Knight and advancing a Pawn to prevent the attack.
Qxh4+ Black takes advantage of the Knight on H3 by moving his Queen in to pin the Knight and once again attack F2, including putting the King in check.
13. g3 Feeling cramped, and wanted to disabuse the Queen from pinning his Knight, White throws out a Pawn gambit to shoo the Queen away.
Qxg3+ It works, kind of. The Queen is now off the H-file and relieves the Knight from her pin. White must avoid the check, though...
14. Kd1 So White moves away from almost certain death.
Nf6 Black wisely moves his Knight out of danger.
15. Rh2 Not content to let Black put the Knight and Rook in the same pin situation, White moves his Rook to the 2 rank.
Nh5 Perhaps afraid of an attack on his Queen, Black moves his Knight over to protect the Queen.
16. Na4 Finally having some breathing room, White decides to use a decouvert to exchange Bishops.
Bxb2 Seeing that the F2 is no longer a viable target square with a bishop attack, Black agrees to the exchange.
17. Nxb2 And White has now cleaned up the Queen-side a little.
Nd4 Black takes advantage of his Bishop's capture by moving his Knight into the Bishop's old resting place at D4 to attack White's Queen.
18. Qf2 Unhappy with Black's Queen leering over the King-side of the board, and deep in White's territory, White offers Black a chance for an exchange.
Qxf3+ Instead, Black puts White into check and forces White into an exchange.
19. Qxf3 White takes Black's Queen.
Nxf3 Black takes the Knight, and attacks the Rook on the H-file.
20. Rf2 White moves the Rook onto the F file to both attack the Knight and allow the White's white-square Bishop some room to maneuver.
Nd4 Black retreats his Knight.
21. a4 By making a pawn attack B5, White tries to minimize the power of Black's Knight; now it can only retreat or be captured.
Bg4+ Black, still intent on using a battery, moves his white-squared Bishop to attack White's King.
22. Kc1 White has little choice but to retreat his King.
Nf6 Black repositions his Knight away from the edge, perhaps to take the unprotected Pawn at E4 and complete his domination of the center of the board.
23. d3 White is having none of it—he moves his Pawn up to protect the lonesome pawn.
b6 Wanting to eliminate White's double pawns on rank 4, Black nudges his B-file Pawn by one square. His next move will probably be to move the C-file Pawn by two squares.
24. Nc4 Anticipating the Pawn advance, White hopes to attack the (soon to be) unprotected Pawn on D6 by moving his Knight forward.
Rad8 Black defends against this by moving his Rook to D8.
25. Ra3 White jolts awake—he's behind 3 Pawns, and behind on positioning and development. To turn this game around, White must develop his unused pieces and reposition his H-file Knight as soon as possible. White moves his Rook forward, uncertain where or how he will move it next.
d5 Black decides to attack the Knight, but must not be paying attention because Black has left his Pawn at E4 unprotected. Surely White will take it...
26. Ne3 ...but White either misses the opportunity to take the E4 Pawn or chooses to fork the Bishop and D5 Pawn instead.
dxe4 Black charges forward, now ahead by 4 points (all Pawns, in fact).
27. Rc3 Finally taking advantage of his newly developed pieces, White decides to get revenge on Black's unprotected Pawns. Will it work?
Be6 Black repositions his Bishop to attack on the other side, especially useful as the diagonal to A2 is a clean shot.
28. Nc4 White opts to block that Bishop attack, even if it temporarily snuffs his own Rook attack.
e3 Not missing a chance to promote a Pawn, Black advances his Pawn without attacking.
29. Nxe3 And White takes the unprotected pawn.
Ng4 Black forces an exchange by forking White's Knight and Rook.
30. Nxg4 White takes the Knight...
Bxg4 Black takes the Knight...
31. Rxc7 ...and White can finally take the unprotected Pawn on rank 7. White knows having a rook so far back is bad news for Black, and just might offset the balance of power long enough to let White regain his footing.
a5 Black's not stupid—he doesn't want all his Pawns taken so he advances the A Pawn by 2, hoping for a capture and possible promotion.
32. b5 White doesn't comply; he knows if he can capture the B6 Pawn, then he'll be that much closer to getting a new Queen.
Rc8 Seeing the storm brewing, Black decides to draw the line in the sand by attacking the mischievous Rook.
33. Rb7 But White proceeds as planned by attacking the B6 Pawn.
Rc3 Black takes advantage of White's zealousness by advancing his Rook. With Black's Knight and Rook, 2 of Black's pieces are attacking C2. White knows what's coming—a Rook move to C8 to form a devastating battery...
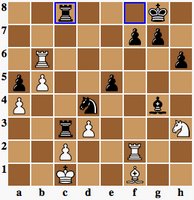 34. Rxb6 If only White can get turn that Pawn into a Queen...
Rfc8 Exactly on cue, Black ignores the potential Queen threat by setting 3 pieces to attack C2. White glances over in shock—with the Bishop attacking D1, White's King is fast running out of places to hide. Mate is soon to follow if he doesn't try something drastic.
35. Kb1 "Get off the Rooks' axis of attack", White thinks. "At least Black won't be able to pummel me completely."
Bd1 Black places the final pieces into place—by forcing an exchange at C2 (a Black Bishop for a White Rook), White will soon be severely compromised. White is getting desperate and must disrupt Black's powerful double-Rook battery.
36. Rc6 White moves his Rook over to fork both of Black's Rooks, block the oncoming attack, and force an exchange, probably with Black's Knight. A poor exchange, but an exchange.
Nxc6 As expected, Black takes with his Knight. However, White realizes now that the power of Black's offense lays in the C-file. If the C-file is disrupted, it will weaken Black's attack and distract him long enough for White to bring in his other unused pieces. But White is grasping at straws now... winning is unlikely at this point and hinges on Black making a big mistake. Nevertheless, he must draw out Black's Rooks from the C file....
37. b6 So, instead of taking the Knight, White advances his Pawn. Black must move his Knight off the C-file to allow his two Rooks to dominate D2 again. Or he'll have to move his Rook off the C-file to prevent the advance of the B-file Pawn.
Rb8 Black chooses to dilute his C-file Rook attack by preparing to take out the Pawn.
38. Kb2 But White will make Black pay for this by taking Black's other Rook.
Rc5 So Black retreats his Rook to a safe distance.
39. c4 White uses this retreat to force his Pawn advance on the C-file, at last buying some time and freeing up rank 2 to make his F2 Rook more useful.
Rxb6+ Black is still in the superior position, and ahead on pieces by a count of 7 (2 Pawns & a Rook). He puts White in check by taking the defenseless B6 Pawn.
40. Kc1 White escapes the Rook attack while forcing Black to move his Bishop.
Bxa4 Black takes White's other defenseless Pawn. Now Black is ahead by 8 points.
41. Kd2 White knows the end is near and must escape quickly from the back ranks. His positioning is awful: his white-square Bishop is choking on rank 1, his Knight on the rim can't move... it's hopeless.
Nd4 Black's Knight hops into the hole at D4, and will likely move his Rook down to rank 2 to force a crippling Rook exchange.
42. Kc3 White wants to at least make Black's attack as uncomfortable as possible—by moving toward the pieces with his King, the Rooks are less powerful. Still, White knows he'll soon be dead.
Bd1 Oddly, Black moves his Bishop back to rank 1. White is scratching his head trying to figure out what Black is planning...
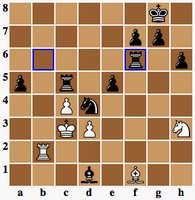 43. Rb2 But whatever—White takes advantage of the breather by launching a counter-attack, hoping for a miracle. If Black doesn't exchange Rooks, then White might have a fighting chance at turning the game around...
Rf6 Black hesitates and opts for both a safe retreat and an attack on the defenseless white-squared Bishop at the same time. This is Black's first major mistake: he would have fared better to force a Rook exchange and cripple White for an easy endgame.
44. Bg2 Rubbing his eyes, White can't believe what he's seeing—Black's King is in a vulnerable position on rank 8 with the only escape route on a white square at H7. If White can unsuspectingly move his Bishop to E4 and get his Rook onto the 8 file, then he can checkmate Black! So White moves his Bishop out of the Rook's attack... but with secret plans to slide it onto E4 to attack H7. Hopefully, Black won't catch on.
Ra6 Black has had enough. He is going to advance his A-file Pawn by putting his Rook on A6 as backup, and nothing is going to stop him. This would also explain Black's Rook move on #42 (moving the Bishop off the A-file path). This is Black's second major mistake: he isn't stopping to look at the larger picture.
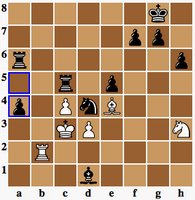 45. Be4 White puts his Bishop into place...
a4 Still with blinders on, Black doesn't see the mate coming...
46. Nf2 White, too, gets distracted by pulling out his Knight from the edge to attack Black's defenseless Bishop. White must not believe his own good luck and has momentarily forgot his plan in a panic to win. White has made a crucial error... one which could mean obliterating his slim shot for a lucky win. Should Black use this move to study the board, he could still take advantage of White's mistake.
a3 Black has abandoned his Bishop; instead, he would rather advance his soldier forward to get a Queen... Failing to look at the overall board for a second time is Black's final, fatal error.
47. Rb8+ White at last succeeds in dealing the coup de grace! Black is too late to defend against both of White's Rook and Bishop.
Rc8 Black's last stand to defend...
48. Rxc8# 1-0 Mate.
You can view this game interactively at Its Your Turn here.




 I have about 5 games of chess going at any given time on
  And here's a beeeee-yooo-tiful pin/decouvert. Again, I'm only really pleased about this because I planned this pin and the game unfolded exactly so. What a rush. (No, I'm not an amazing player at all—Chess is a bloody difficult game to master and you have to relish your infrequent victories else you'll succumb to perpetual discouragement and crippling meloncholy.)

